

Introduction to Giraffe Drawing
Drawing animals can be a delightful way to express your creativity, and giraffes are particularly fascinating creatures to capture on paper. With their long necks and distinctive patterns, giraffes present a unique challenge for artists. In this guide, we will explore the techniques and methods needed to create a stunning giraffe drawing. So, let's gather our materials and get started!

Materials Needed for Giraffe Drawing
Before we dive into the world of giraffe drawing, it's important to gather the necessary materials. Here's a list of the essentials:
Drawing paper: Choose a high-quality, acid-free paper to ensure your artwork lasts.
Pencils: Different pencil grades (ranging from 2H to 6B) will allow you to achieve various shades and textures.

Eraser: A kneaded eraser is recommended for easy correction and blending.
Drawing board: This will provide a smooth surface to work on and prevent any smudging.
Reference image: Find a clear, high-resolution picture of a giraffe to guide your drawing.
Now that we have our materials ready, let's move on to understanding the basic shapes of a giraffe.
Understanding the Basic Shapes of a Giraffe

Every drawing starts with basic shapes, and giraffes are no exception. By breaking down the complex form of a giraffe into simpler shapes, you can easily construct a solid foundation for your drawing. Begin by sketching a large oval for the body and a smaller circle for the head. Connect the two shapes with a curved line to represent the neck. Next, add two long ovals for the legs and smaller circles for the joints. Remember, these initial shapes are just guidelines, so keep your lines light and flexible.
Step-by-Step Guide: How to Draw a Simple Giraffe
Now that we have a basic understanding of the giraffe's structure, it's time to start drawing! Follow these steps to create a simple giraffe:
Step 1: Start by lightly sketching the basic shapes we discussed earlier. Use smooth, flowing lines to connect the body, head, neck, and legs.
Step 2: Refine the shape of the head by adding small, rounded ears and a gentle curve for the mouth. Don't forget to sketch the eye, using a small oval shape.
Step 3: Begin adding details to the body by outlining the distinctive pattern of a giraffe's coat. Use a combination of irregular shapes, such as small ovals and uneven lines, to recreate the spots.
Step 4: Now it's time to focus on the legs. Add more details by drawing the hooves and defining the joints. Giraffes have long, slender legs, so make sure to emphasize their elegant proportions.
Step 5: Once you are satisfied with the overall structure and details, darken the lines to give your drawing more depth. Erase any unnecessary guidelines and refine the shapes as needed.
Congratulations! You have successfully drawn a simple giraffe. But we're not done yet. Let's move on to adding more details to make your giraffe drawing even more impressive.

Adding Details to Your Giraffe Drawing
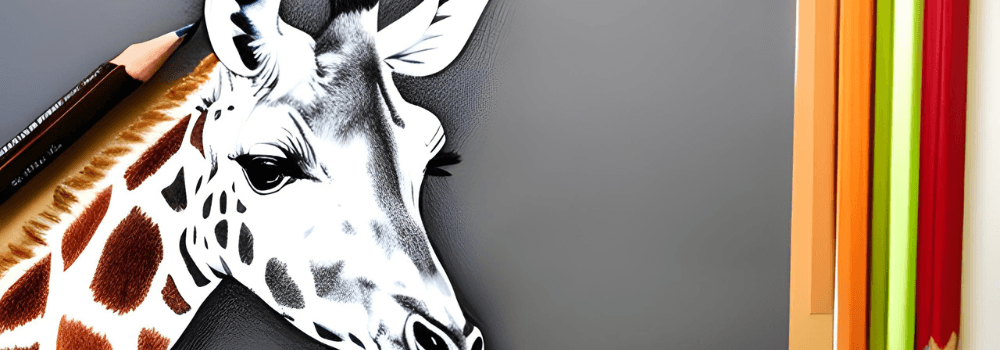
To make your giraffe drawing more realistic and captivating, it's important to pay attention to the finer details. Giraffes have unique features, such as their ossicones (the horn-like structures on their heads) and long eyelashes. Take your time to carefully observe these distinctive characteristics and incorporate them into your drawing. Use light, delicate strokes to add texture to the fur, and don't forget to include the tail with its signature tuft of hair. By focusing on these details, you can bring your giraffe drawing to life.

Tips for Achieving a Realistic Giraffe Drawing
Drawing a realistic giraffe requires practice and attention to detail. Here are some tips to help you achieve a lifelike representation:
Study giraffe anatomy: Understanding the proportions and skeletal structure of a giraffe will help you create a more accurate drawing.
Use reference images: Referencing high-quality images of giraffes will allow you to capture their unique features and patterns.
Practice shading: Giraffes have areas of light and shadow. Experiment with different pencil grades to achieve a realistic three-dimensional effect.
Be patient: Giraffe drawing requires patience and precision. Take your time and don't rush the process. Enjoy each step and embrace the learning experience.
By following these tips, you'll be well on your way to creating a realistic giraffe drawing that will impress others.

Common Mistakes to Avoid When Drawing a Giraffe
As with any artistic endeavor, there are common mistakes to be aware of when drawing a giraffe. By knowing these pitfalls, you can avoid them and improve your artwork. Here are a few mistakes to watch out for:
Incorrect proportions: Giraffes have long legs and necks, so it's essential to get the proportions right. Double-check your measurements and compare them to your reference image.
Overworking the details: While details are important, it's easy to get carried away and lose the overall structure of the drawing. Remember to step back and assess your work from a distance to maintain balance.
Neglecting the background: A giraffe drawing can benefit from a well-thought-out background. Consider adding elements like trees or grass to create a more complete composition.
Taking note of these common mistakes will help you avoid them and create a more polished giraffe drawing.

Taking Your Giraffe Drawing to the Next Level: Adding Shading and Texture
To elevate your giraffe drawing to a new level of realism, adding shading and texture is crucial. Shading helps create depth and dimension, while texture adds richness to the fur and skin. Here's how you can achieve this:
Determine the light source: Identify where the light is coming from in your reference image. This will guide the placement of shadows and highlights.
Start with light shading: Use a light pencil grade (like 2H) to lightly shade the areas that are facing away from the light source. Gradually build up the layers to create a smooth transition.
Add darker tones: Switch to a darker pencil grade (like 2B or 4B) to deepen the shadows and add more contrast. Pay attention to the areas where the body overlaps, as these tend to be darker.
Blend and smudge: Use a blending tool or your finger to gently blend the shaded areas, creating a seamless transition between light and dark. Be careful not to over-blend, as this can result in a loss of texture.
Add texture: To mimic the texture of a giraffe's fur, use small, controlled strokes to create short lines or dots. Vary the pressure and direction of your strokes to achieve a realistic effect.
By incorporating shading and texture, your giraffe drawing will come to life with depth and realism.
Showcasing Your Giraffe Drawing: Sharing and Receiving Feedback
Now that you have put your heart and soul into creating a beautiful giraffe drawing, it's time to share it with others. Sharing your artwork not only allows you to showcase your skills but also opens up opportunities for growth and improvement. Here are a few ways to share your giraffe drawing and receive valuable feedback:
Online art communities: Join art forums or social media groups dedicated to sharing artwork. Post your giraffe drawing and ask for constructive criticism and tips from fellow artists.

Art contests: Participating in art contests can provide exposure and feedback from experienced judges. Look for contests that specifically focus on animal drawings or wildlife art.
Local art exhibitions: Consider displaying your giraffe drawing at a local art gallery or community event. This will allow you to receive feedback from a diverse group of people.
Remember, feedback is essential for growth as an artist. Embrace both positive comments and constructive criticism to refine your skills and continue your artistic journey.
Conclusion: Embrace the Joy of Giraffe Drawing

Drawing a giraffe is an exciting and rewarding experience, especially when you see your artwork come to life. By following this step-by-step guide and practicing regularly, you can master the art of giraffe drawing. Remember to start with the basic shapes, add details, and pay attention to shading and texture. Embrace the joy of creating and sharing your giraffe drawings. So, grab your pencils and let your imagination roam free as you embark on this artistic adventure. Happy drawing!
Leave a comment
All comments are moderated before being published.
This site is protected by hCaptcha and the hCaptcha Privacy Policy and Terms of Service apply.